Do you have a Woocommerce Store? If yes, We have something cool to share with you today.
If you are familiar with the Woocommerce then you know what notifications bars are? and how it helps to boost up the conversions on your e-commerce store.
If you are just a beginner who’s learning to set up your Woocommerce store, then hold back. We will be talking about Notifications Bars and how you can create some nice notifications bars in the easiest way.
Let’s know what notifications bars are.
Table of Contents
What Is a Woocommerce Notification Bar?
The notification bar is the header widget or bar which is placed above the header in most of the e-commerce websites with some sort of announcement or offers. which is visible on every page of the website.
This notification bar helps website owners to increase their website conversions by attracting more and more customers on their landing page with the help of a notification bar.
It looks something like this
This is how store owners optimize their conversion rates.
Notification bars can also help you in multiple ways like:
- Introducing your new product/service to every website visitor.
- Giving special offers for 1st-time visitors, increasing chances of conversion.
- You can grow your email list with a notification bar.
You must be like, Oh man, It’s great. How Can I Do That?
How to Create Notification Bars for Your WooCommerce Website?
There are multiple ways you can create notification bars like you can use some custom codes. Well, You’re using WordPress and there are already multiple plugins available for notification bars.
We recommend using OptinMonster for creating Notification Bars on your Woocommerce website. We also recommend OptinMonster for email list building. You can read our complete OptinMonster review.
Let’s learn to create Notification bars with OptinMonster.
Step 1: Login To Your OptinMonster Account
You need an OptinMonster account in order to create your notification bar. If you don’t have an account, simply go to OptinMonster and get yourself registered with your details.
Make sure you verify your email after signing up on theOptinMonster website.
Step 2: Creating A Campaign In OptinMonster
Now you have to create a campaign inside your OptinMonster account. After creating the campaign, select your campaign type.
Select the floating bar from the menu.
You will see there’s a lot of template options available for the type of notification bar you want to create. You can choose any option on the basis of your objective.
We recommend you to select “Alert” from the menu.
Now, just you need to set the name of your campaign and then you have to connect it with your Woocommerce store.
Step 3: Customizing The Campaign Via Editor
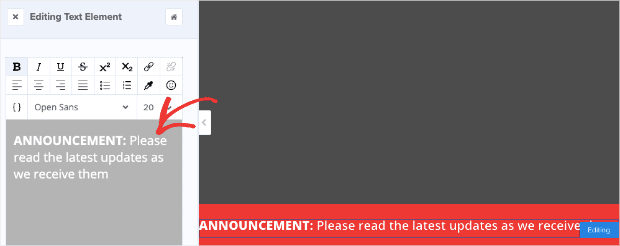
After creating and connecting the campaign, you have to customize it. In this step, we will be customizing the campaign with the help of OptinMonster. For example, you can edit the text and the appearance of the notification bar and many more things.
Just click on the section and you will get options to customize the complete area.
You need to customize your campaign according to the objective of your notification bar on your Woocommerce store. You have multiple options like changing the colors, updating the redirect link, and many more.
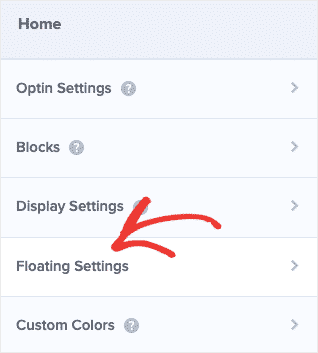
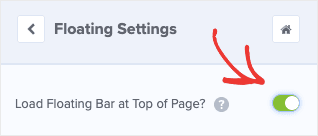
The notification bar is positioned on the bottom of the website by default but you can customize it as well.
To customize it:
- Click on the “float settings” found on the editor’s home menu.
- Click on the green button beside the “load floating bar at the top of Page.”
- The notification will move to the upper side.
Step 4: Setting Up Display Rules
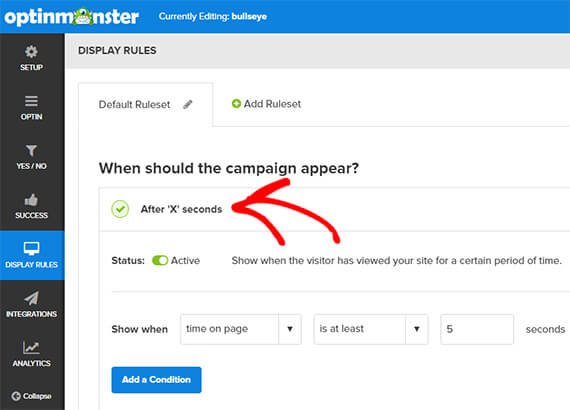
In this step, we will define when will the notification bar appears on the customer window. In simple terms, on what conditions or pages will the Notification bar appear.
You need to set the display rules by going to the display rules options on the left side of the windows.
You can set the time after which the notification bar will appear. You also have the option to show the notification bar on some specific pages. You have both options available.
- Time On Page
- Current URL Path
The first option is used to show the notification bar after a certain time to the visitors whereas the Current URL path will define on which pages the notification bar will appear to the visitors.
You can decide this on the basis of your requirement and the objective of the notification bar.
Step 5: Save and Publish Your Woocommerce Notification Bar
Just navigate to the menu and hit that “Save” button and then click the Publish button from the same menu. You have successfully created your notification bar for the Woocommerce website.
Conclusion
Notification bars are really helpful in increasing store conversions and for increasing engagement as well. We explained the easiest way to create notification bars for Woocommerce websites using OptinMonster. They have some more amazing features which might help you grow your business.
Still, having issues? do let us know in the comments below.
