Paypal is one of the best ways to do online transactions internationally. It is the most used and one of the most secure online payment services. Few others are also in the market but if we talk about reliability no other can compete PayPal
The platform provides an easy way to use by click and fill method but there are few plugins that make it easier for the normal user, as well as developers and WPForms, is one of them.
The charges of the service are also good neither so high nor low, so a new user or someone who doesn’t want to spend a lot on this type of business in the initial stage can also purchase it and use it for transactions.
There are multiple ways to make it possible for your customers to pay through PayPal on your WordPress website. You can use any type of payment through this like Donation, subscription, or Sell any product or services.
Table of Contents
How To Accept Paypal Payments On WordPress?
Using the WPForms plugin is the easiest way to integrate Paypal with your WordPress website.
The best thing is you don’t need an account on PayPal or stuck with the HTML codes. Similarly, it helps to integrate PayPal for payment like Donation, subscription, and more.
This method is quite tricky so stick with the instruction and then do accordingly. There are few simple steps to install and use with WPForms.
Step 1: Install WPForms With PayPal Add-on
Firstly, Install the latest version of the WPForms plugin on your website.
Get the WPForms Pro license, because you will not be able to add the Paypal Add-on on the free version.
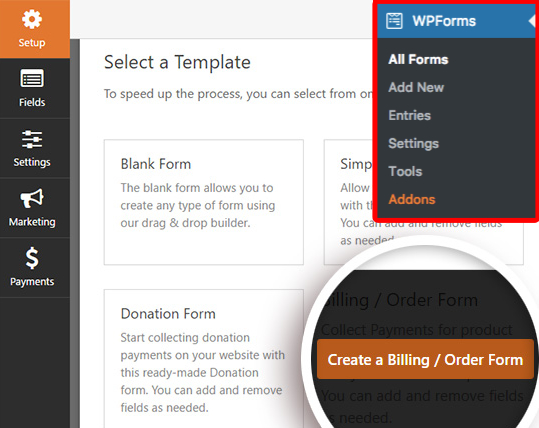
Go to the WPForms>> Addons then look for Paypal Add-on and add it in your WPForms account.
Now we will create a form. You can select the “Create a Billing/ Order Form” template from the form options. You can modify the form as per your requirements.
After this tutorial, you can use any of the other templates according to your need. This is a default option and most of the users use this in the payment form.
Step 2: Adding PayPay payment to Form
After the setup is completed and form is created now need to connect it.
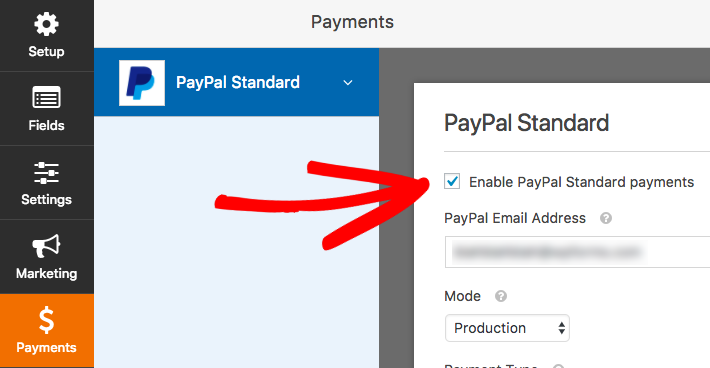
In the left corner go to Payments-> PayPal Standard. Check on the box named Enable PayPal Standard Payments.
After that, there are a few more columns you have to fill out.
Paypal Email Address– For PayPal account, where the payment will send.
Mode – Production or Test/Sandbox
Payment Type: You can choose products and services or donations according to the requirement.
Cancel Url– If the user cancels the transaction then where they will be redirected to.
Shipping– If the user confirms the payment then where the user will be redirected to.
After that, there is a 2 checkbox button at the end of the setting. In the first box “Don’t ask the buyer to include notes”. If you check this box to turn this feature off.
In the second option if it checks then it enables conditional logic. Useful when you allow the user to choose either paying with strip or Paypal.
After all that setting you click on Save to store the payment information.
Step 3: Set Up Conditional Logic (Optional setting)
In the previous step, we discuss the last checkbox of conditional logic. It changes the behavior of form according to the option chosen by the user and allows to create the “smart form”.
There are few conditional logic you can use for example: “Allow the user to choose either paying with strip or Paypal” or “Making payment optional”.
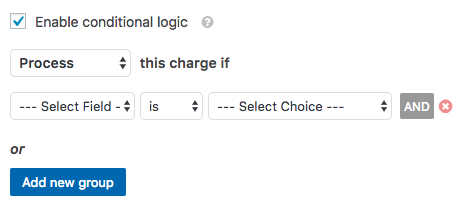
Once you check this box another option will be visible to you and now you can set the option rules about when the user redirects to the payment process panel.
The option is:
Process: Defined which logic will start if the condition fulfills.
Select Field: Choose where you want to apply this condition in form.
Is: Choose the sorting you like to use like is, is not, empty, contains, start with, ends with, greater or less than, etc.
Select Choice: Let the condition to apply this condition.
Let’s see one example for that, lets set up some fictitious logic to tun Paypal payment if the user chooses to Enroll for the counseling.
Firstly, you need to add a dropdown section where we use the conditional rule and let the user choose for the option.
After enabling the conditional logic in the “PayPal standards” you need to set the conditional logic like- Process this charge if Would you like to enroll for counseling? is set to Yes, if enroll me!
Now in this case user will redirect to the payment option if and only if choose for the Enroll for the counseling. No, any charges will be there is users don’t want to enroll.
In the same way, you are free to put any condition with your website or any other application.
At last, we suggest using the WPForms plugin which will be best and effective. No need to use any codes or any other unnecessary steps. Other methods are quite tricky but it will also work but you don’t get the additional option for adding conditions and few more options. Of course, it will charge you can earn a lot using this.
Frequently Asked Questions
How to check whether the process works or not?
Since it will work 100% but instead of all if you want to check then we recommend you try this first at test mode, if all works well then only apply to your website.
How to confirm that PayPal payment is submitted?
One the setup completed you will redirect to the payment page to complete the transaction. Just after that, you will get the confirmation email to the registered email provided bu you.
That’s it. If you faced any problem in any of the above steps. Do let me know in the comments section below.


